
WP-CLI를 사용한 일괄 번역 실행
WP-CLI 와 bash 스크립트를 사용하여 번역을 일괄로 실행할 수 있습니다. 이를 통해 다른 작업을 하는 동안 백그라운드에서 번역을 실행할 수 있습니다.
이를 위해 두 개의 bash 스크립트를 작성합니다:
- 일괄 처리 로직을 포함하는 메인 스크립트 (변경 불필요)
- 번역할 항목을 정의하는 설정 파일 (번역 실행마다 업데이트)
메인 스크립트
번역 처리 로직을 포함하는 gatotranslate.sh 파일을 작성합니다 (샘플 다운로드):
gatotranslate 명령에 전달하는 매개변수를 커스터마이즈할 수 있습니다 (예: --status-to-update=draft, --status-when-translated=same-as-origin, --parts=properties 등).
#!/bin/bash
# ------------------------------------------------------------------------------------------------
# Load configuration
# ------------------------------------------------------------------------------------------------
SCRIPT_DIR="$(cd "$(dirname "${BASH_SOURCE[0]}")" && pwd)"
source "${SCRIPT_DIR}/gatotranslate.config.sh"
# ------------------------------------------------------------------------------------------------
# Arguments
# ------------------------------------------------------------------------------------------------
# (Optional) Provide the start batch number as an argument, default is 1
start_batch=${1:-1}
# ------------------------------------------------------------------------------------------------
# Logic
# ------------------------------------------------------------------------------------------------
batch_size=${batch_size:-1} # If not provided, default to 1
total_items=${#items[@]}
total_batches=$(((total_items + batch_size - 1) / batch_size))
start_batch_index=$(((start_batch - 1) * batch_size))
echo "----------------------------------------"
echo "Translating $subcommand items"
echo "----------------------------------------"
echo "Batch size: $batch_size"
echo "Total items: $total_items"
echo "Total batches: $total_batches"
echo "Starting from batch number: $start_batch"
echo "----------------------------------------"
for ((start=start_batch_index; start<total_items; start+=batch_size)); do
# Get the next batch of items
batch=("${items[@]:$start:$batch_size}")
echo "Processing batch #$((start/batch_size + 1))"
# Pass all items in the batch as separate arguments
cmd=$(printf 'wp gatotranslate %s "%s" --status-to-update=any --user=%s' "$subcommand" "${batch[*]}" "$user")
echo "Command: $cmd"
eval $cmd
exit_code=$?
if [ $exit_code -ne 0 ]; then
echo -e "\a\a\a\a\a"
exit 1
fi
done
# Finished successfully
echo -e "\a"
echo "----------------------------------------"
echo "Finished successfully 👏"
echo "----------------------------------------"설정 파일
일괄 번역 설정을 포함하는 gatotranslate.config.sh 파일을 작성합니다 (샘플 다운로드):
user="admin"
subcommand="post"
batch_size=1
items=(
4118
4117
4116
3739
)이 파일에는 다음 변수들이 포함되어야 합니다:
| 변수 | 설명 |
|---|---|
user | 명령을 실행할 WordPress 사용자 이름 (일반적으로 admin) |
subcommand | 실행할 gatotranslate WP-CLI 서브커맨드 (post, media, term 또는 menu) |
batch_size | 각 일괄 처리에서 번역할 항목 수 (기본값은 1) |
items | 번역할 항목의 ID 배열 (게시물, 태그, 카테고리, 미디어, 메뉴 등) |
스크립트 실행
wp 명령을 사용할 수 있는 WordPress 루트 디렉토리에서 실행하세요.
일괄 번역을 실행하려면 다음 명령을 실행합니다:
bash +x gatotranslate.sh스크립트는 지정된 일괄 크기로 모든 항목에 대해 gatotranslate 명령을 실행하며, 각 일괄 처리의 진행 정보를 표시합니다.
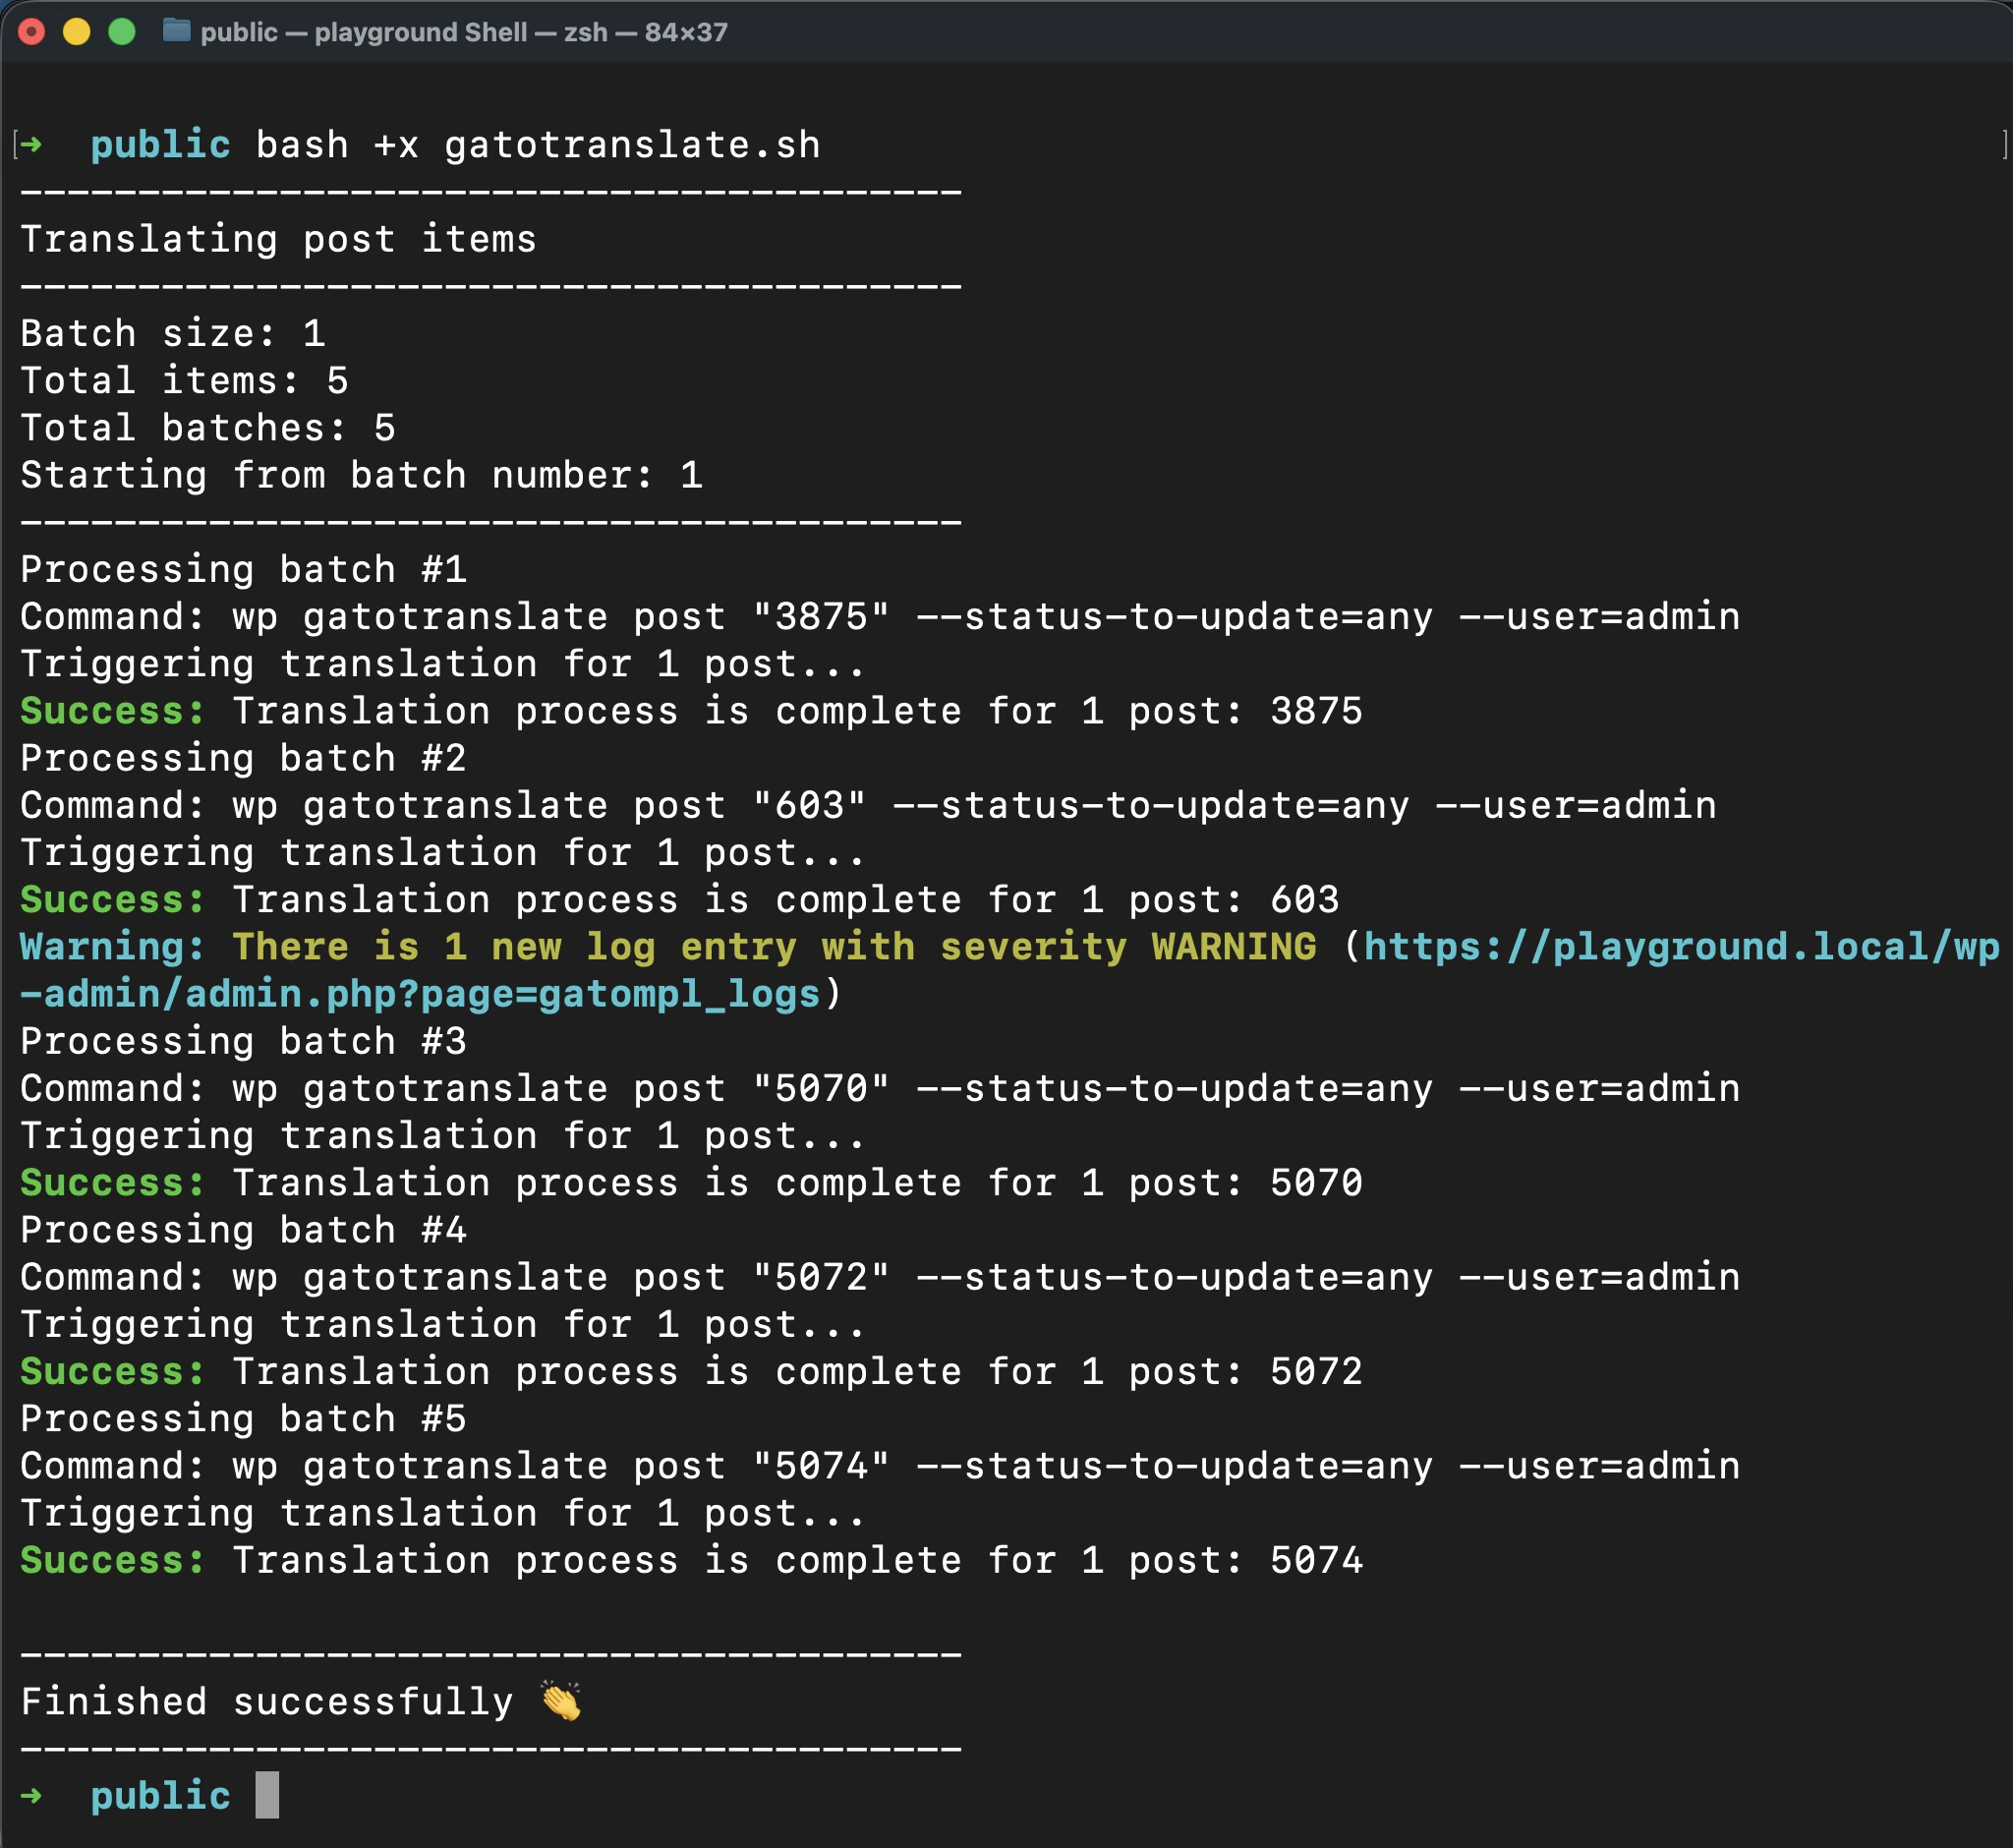
스크립트가 성공적으로 완료되면 단일 비프음이 울립니다.
오류 발생 시 실행 중단
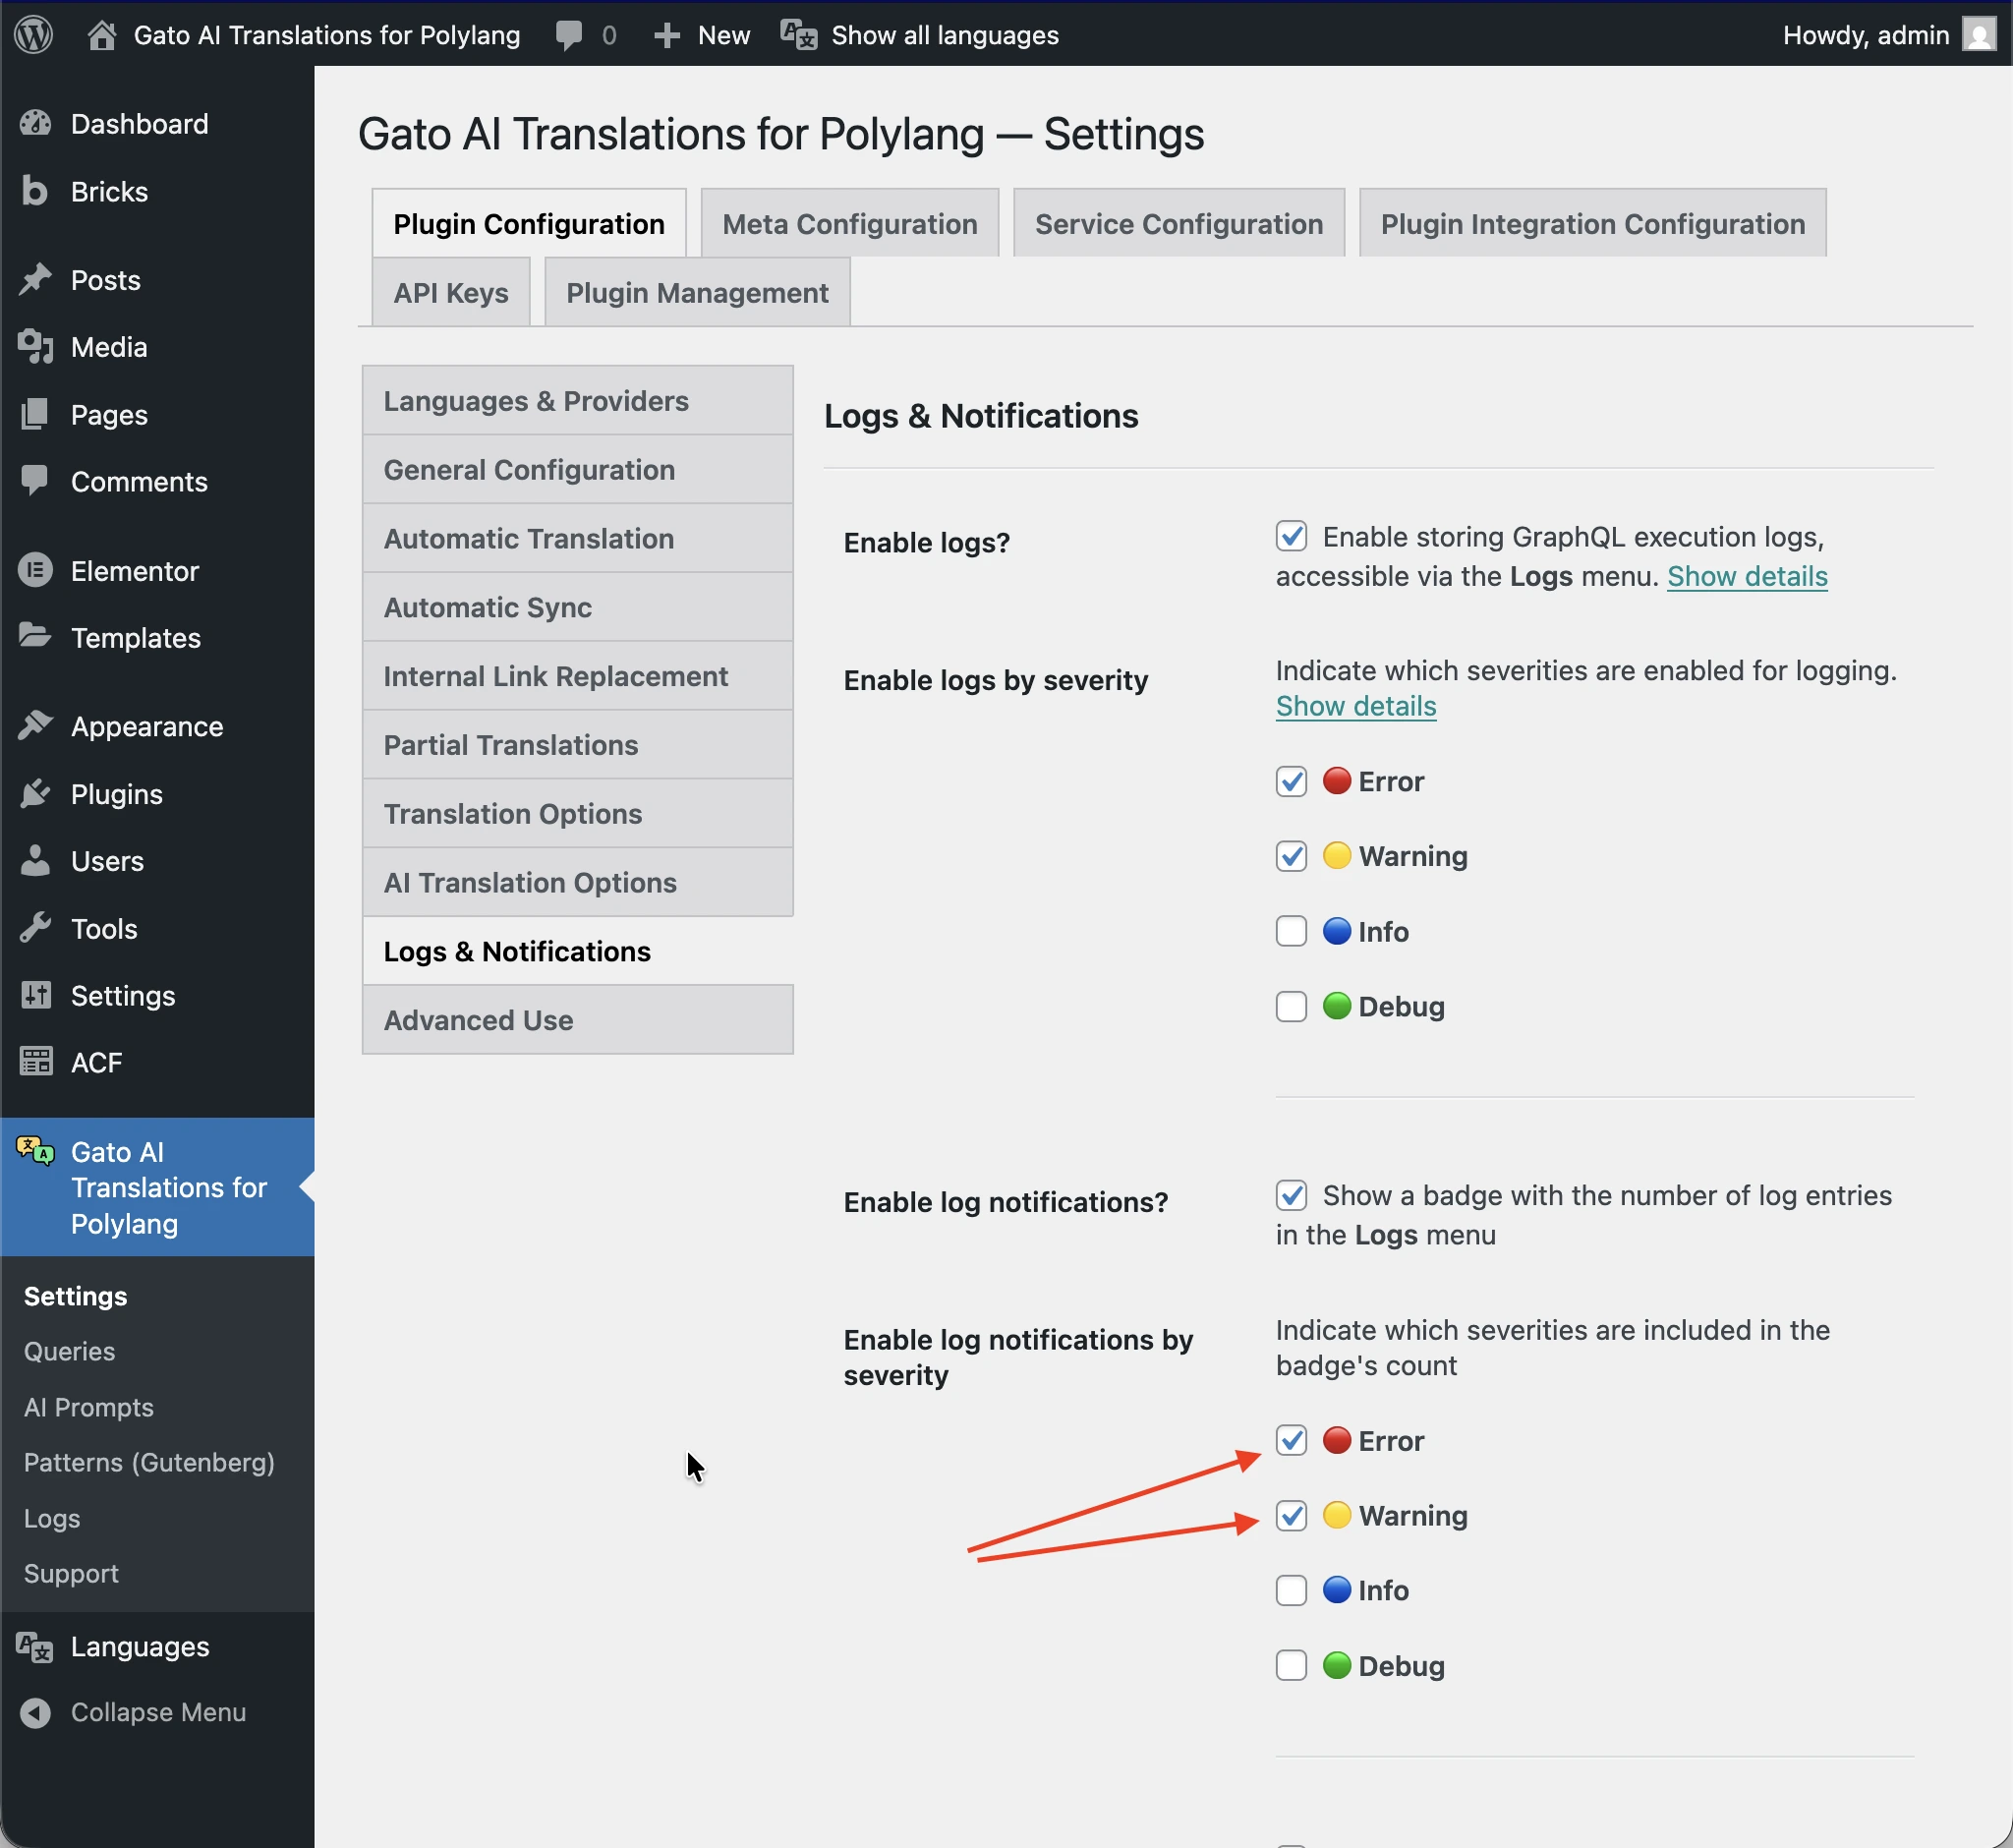
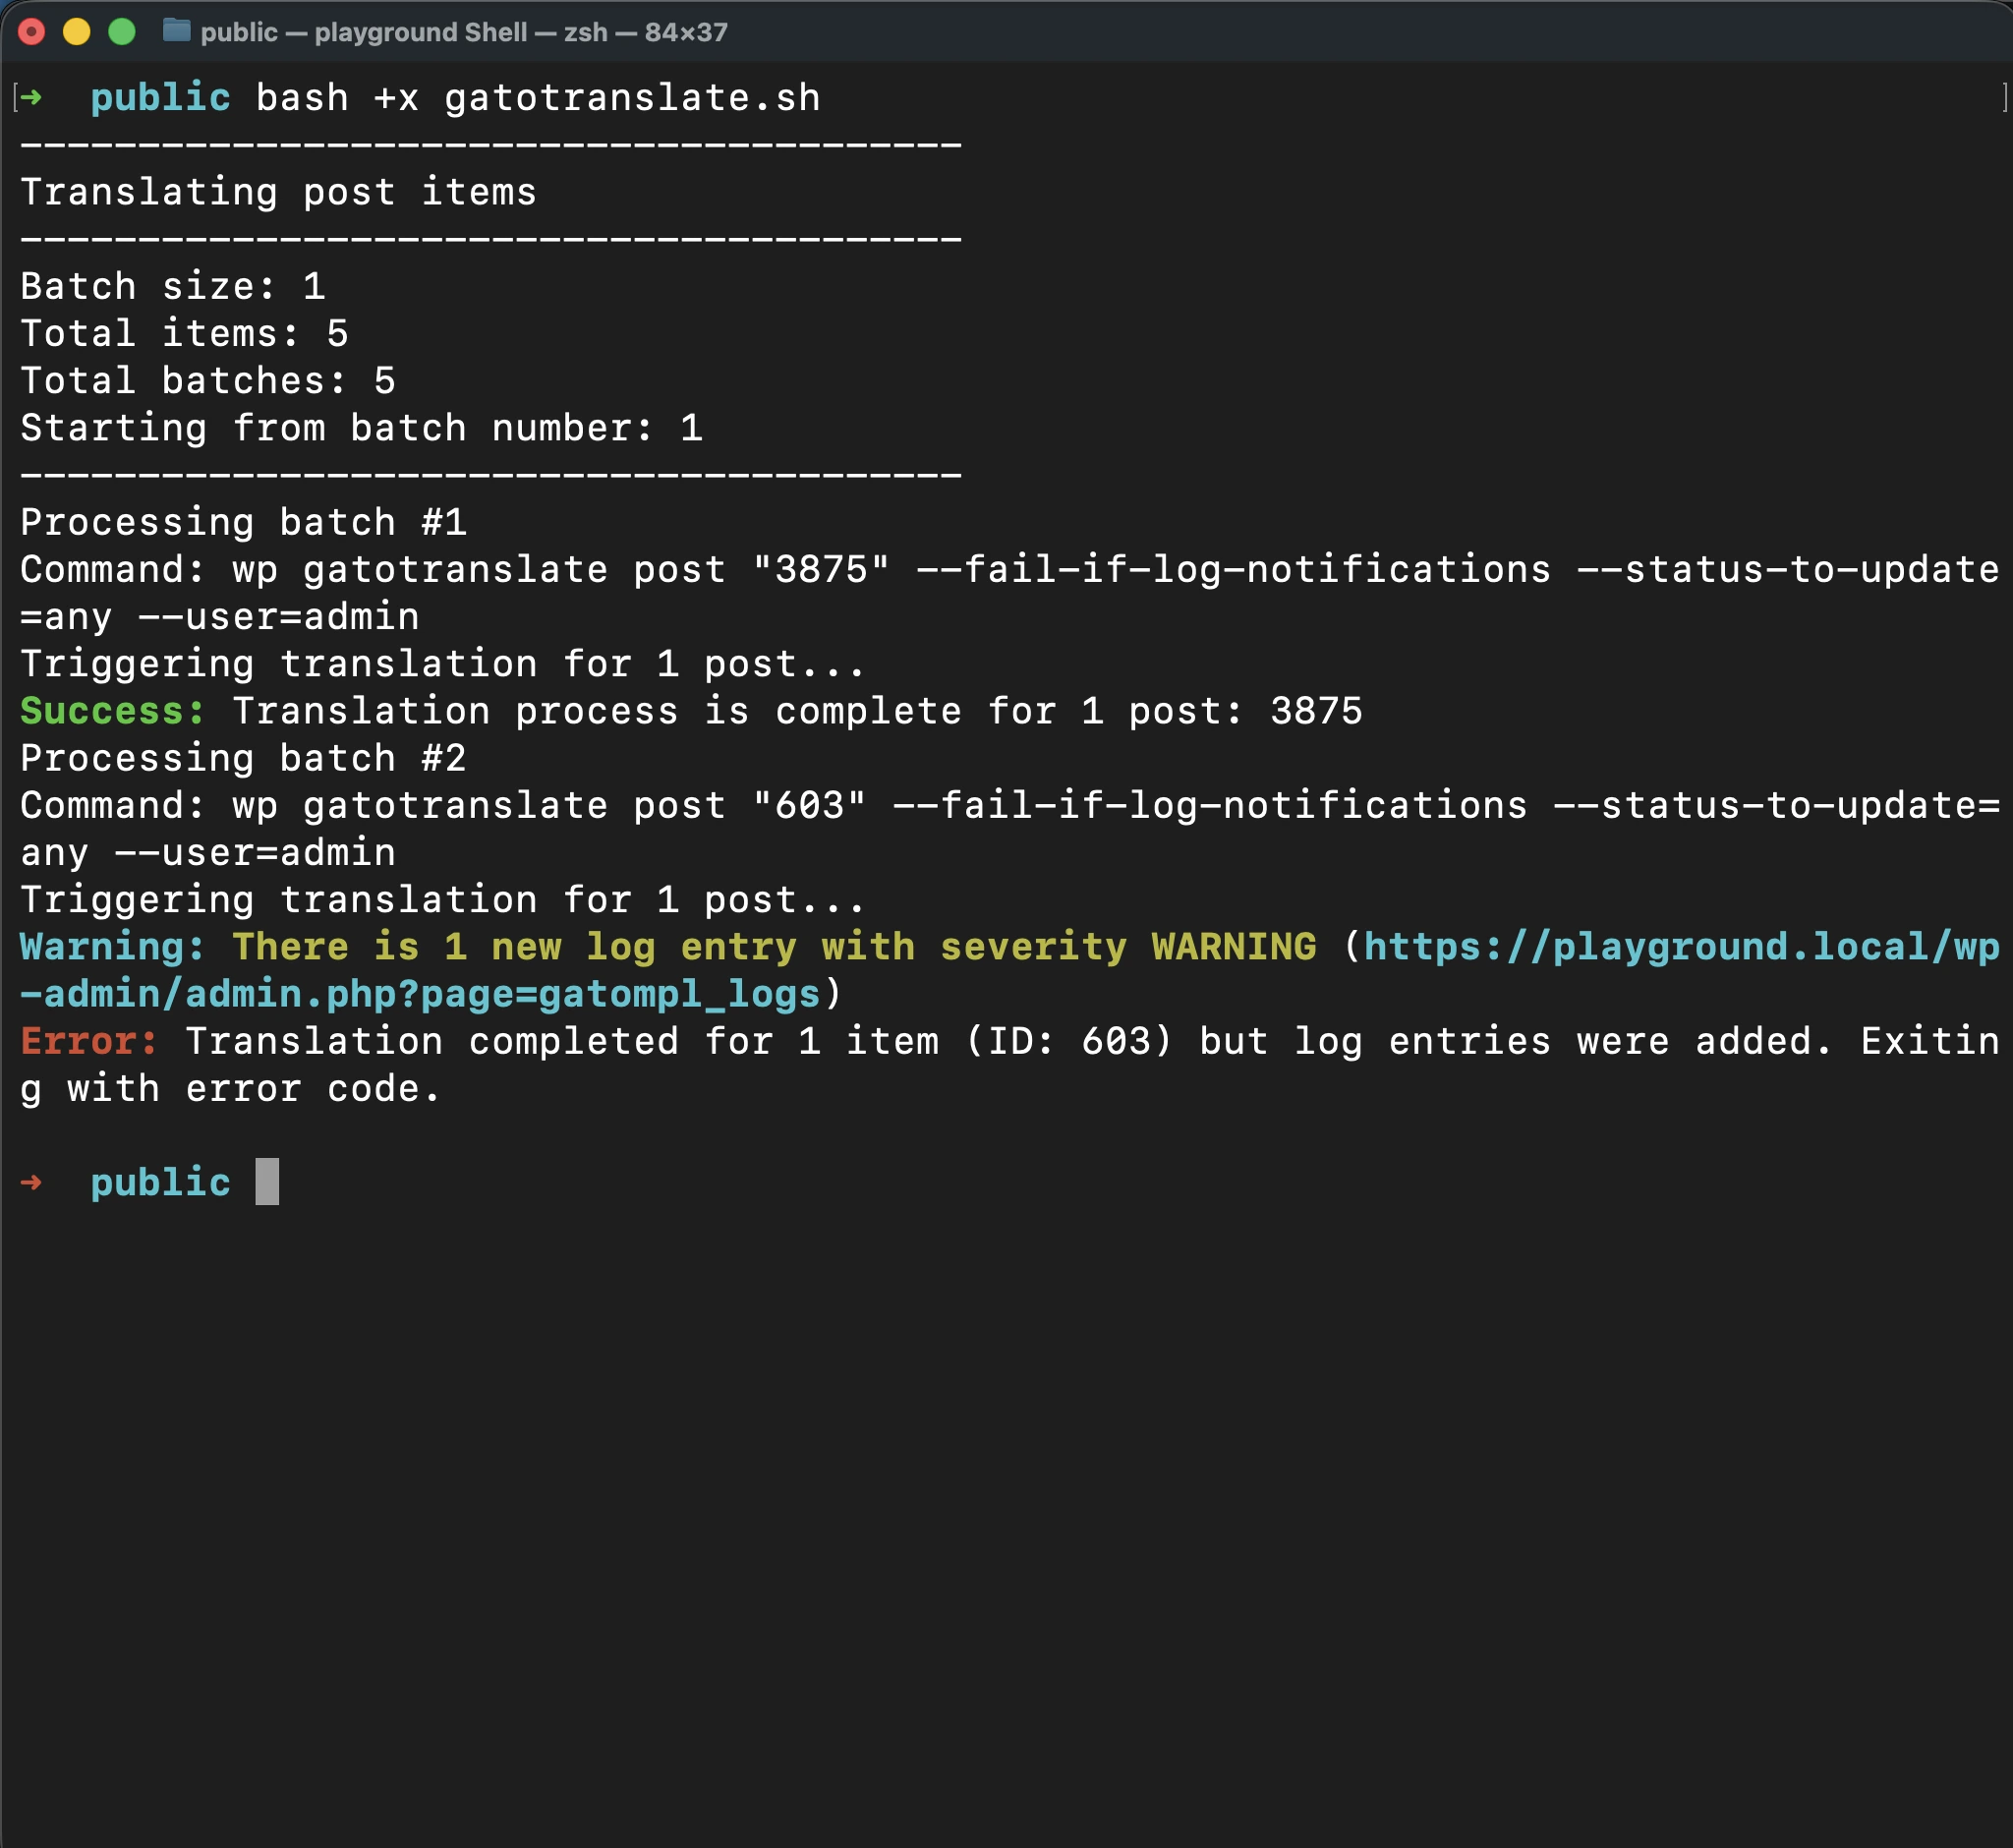
로그에 오류나 경고가 추가될 때마다 스크립트를 자동으로 중단시키려면, gatotranslate.sh 내의 명령에 --fail-if-log-notifications 매개변수를 추가합니다:
cmd=$(printf 'wp gatotranslate %s "%s" --fail-if-log-notifications --status-to-update=any --user=%s' "$subcommand" "${batch[*]}" "$user")스크립트 중단을 트리거하는 로그 알림의 심각도는 Settings > Plugin Configuration > Logs & Notifications 페이지에서 설정된 값이 적용됩니다.
로그 알림으로 인해 스크립트가 중단되면 긴 비프음 시퀀스가 울립니다.
문제를 수정한 후에는 일괄 번호를 인수로 전달하여 실패한 지점부터 번역을 재개할 수 있습니다.
이를 통해 이미 성공적으로 번역된 항목을 재처리하지 않아도 되므로 시간과 API 크레딧을 모두 절약할 수 있습니다.
예를 들어, 일괄 처리 2에서 실패가 발생한 경우, 문제를 수정한 후 다음을 실행합니다:
bash +x gatotranslate.sh 2응용: 번역할 항목의 ID 가져오기
일괄 번역을 설정할 때 번역할 항목의 ID를 알아야 합니다.
플러그인은 내부적으로 Gato GraphQL을 실행하므로, GraphQL 쿼리를 실행하여 이 정보를 편리하게 가져올 수 있습니다.
GraphQL 쿼리를 실행하려면 먼저 Advanced Mode를 활성화하고 Queries CPT에 접근해야 합니다. Advanced Mode 활성화 방법은 헬퍼 쿼리 작성을 참조하세요.
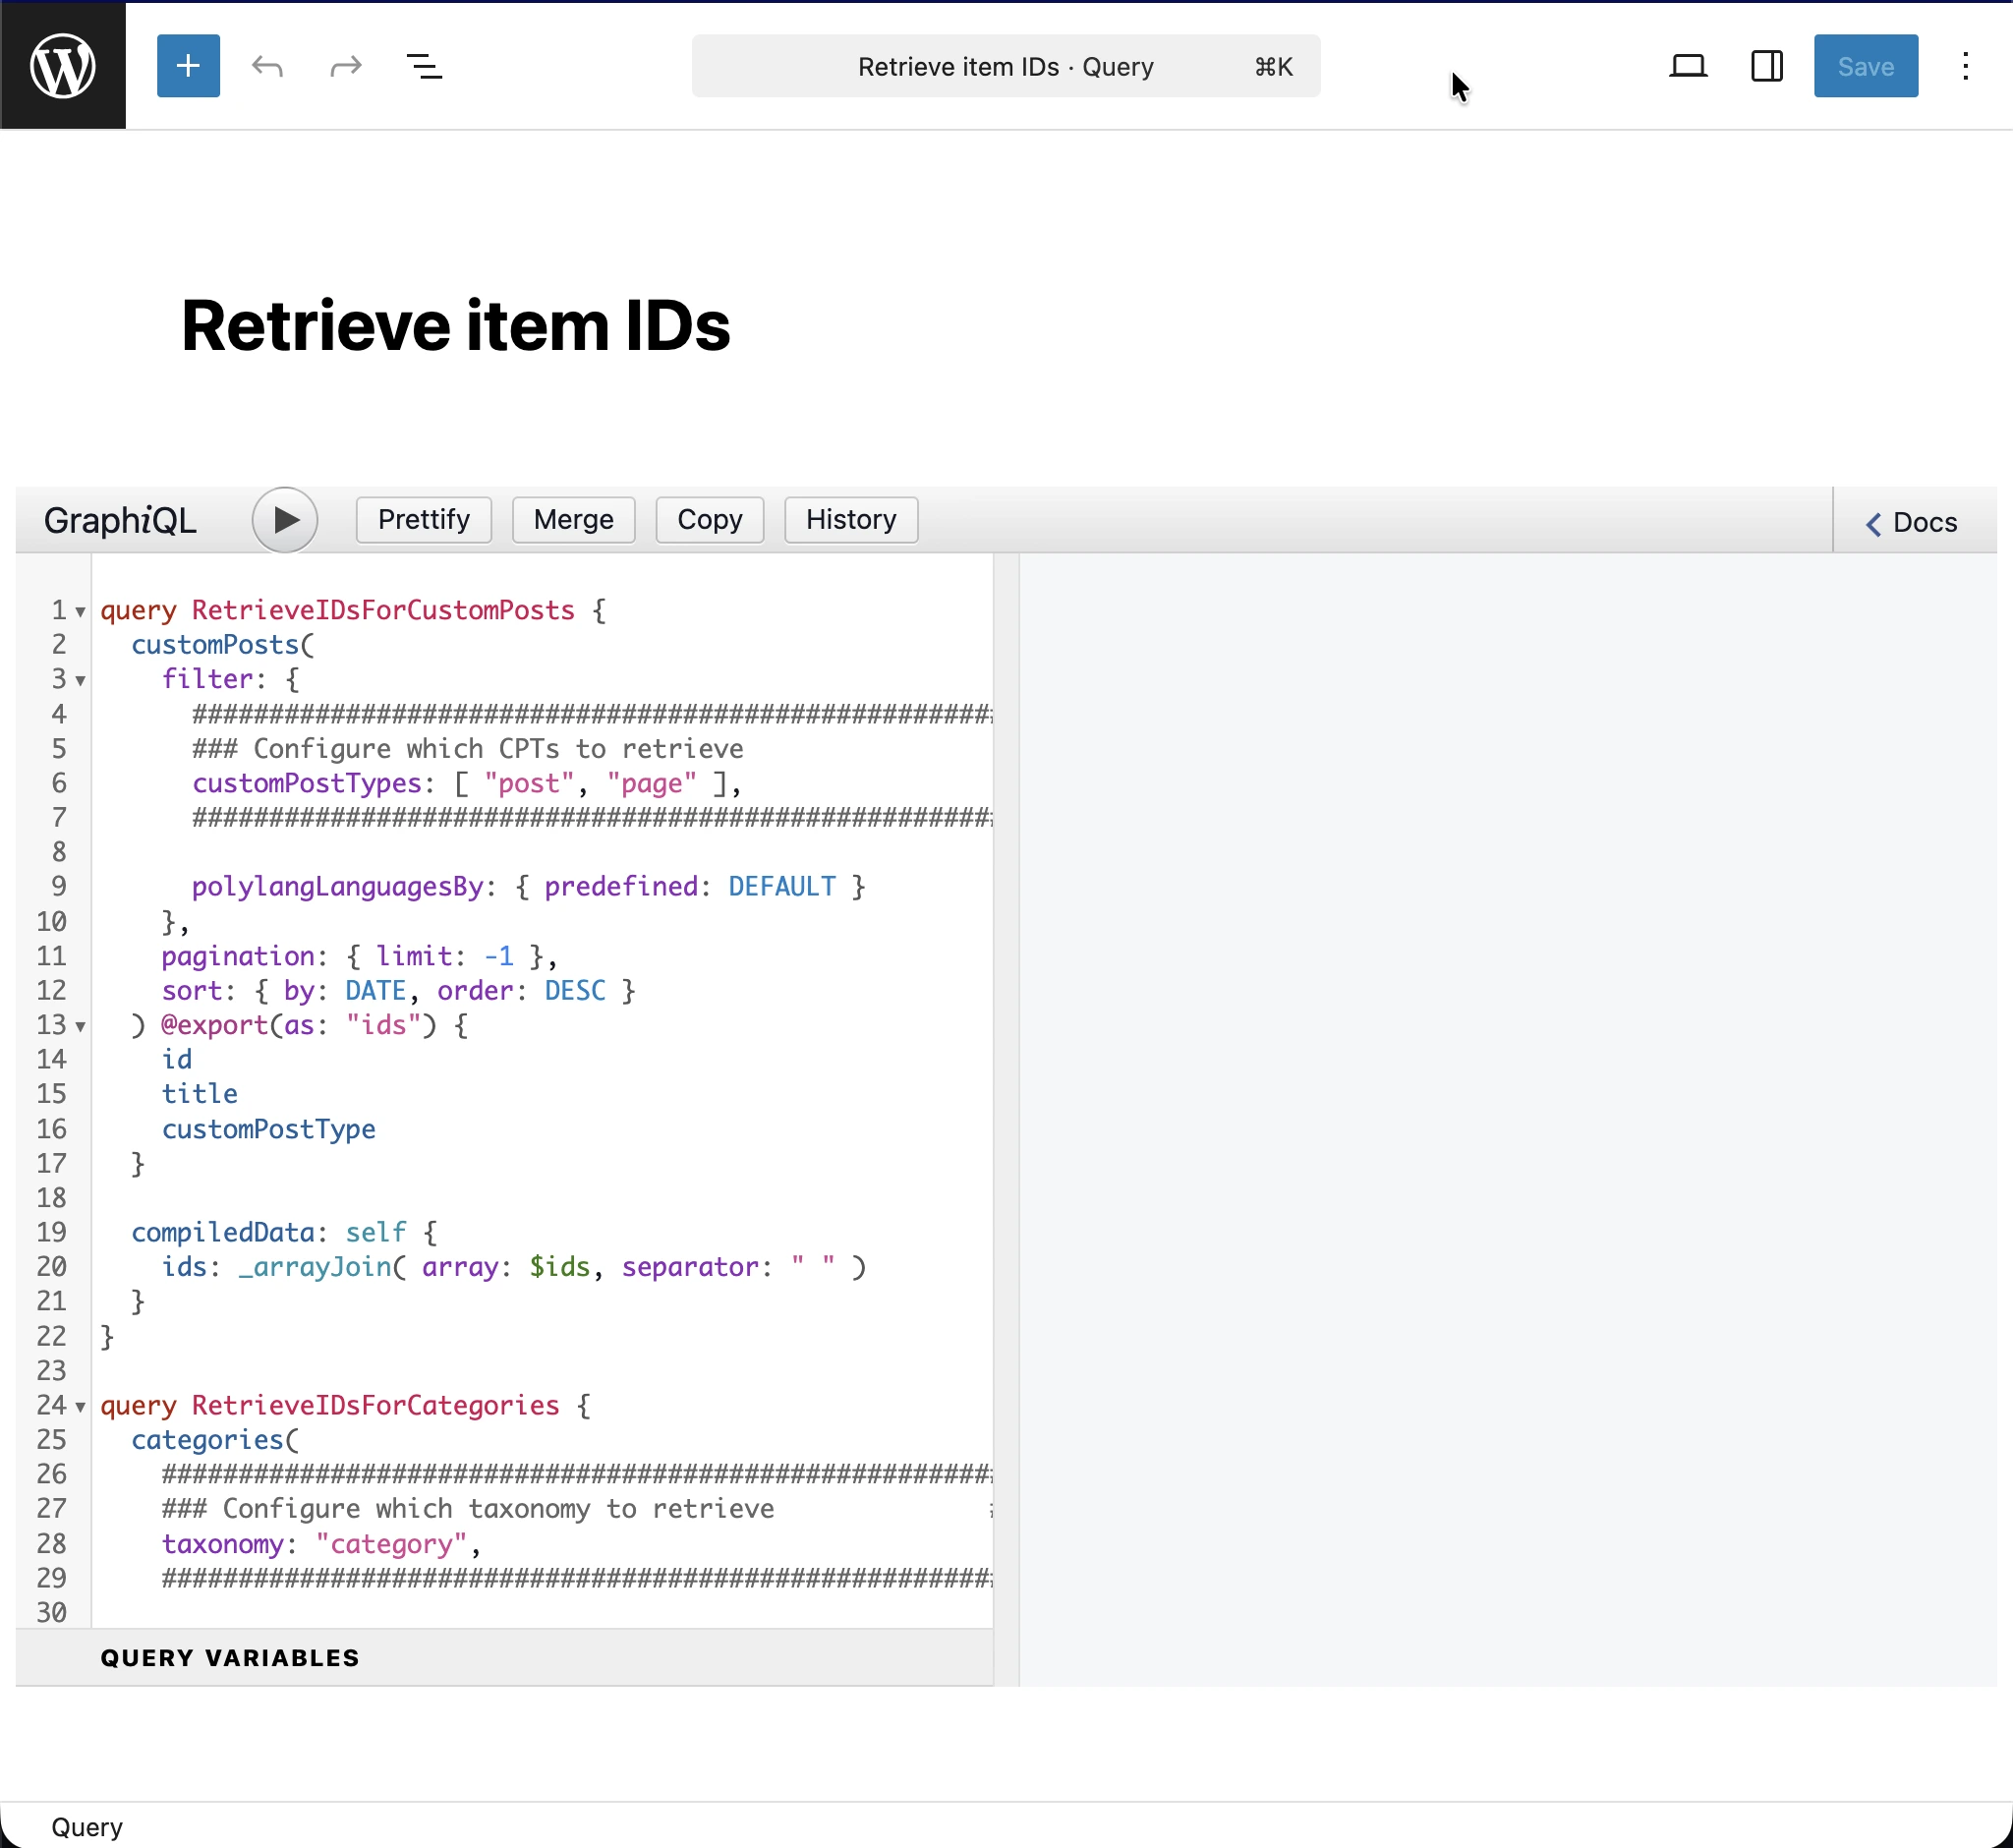
Queries에 새 항목을 추가하고, 제목을 Retrieve item IDs로 설정한 후 다음 GraphQL 쿼리를 입력합니다:
query RetrieveIDsForCustomPosts {
customPosts(
filter: {
#########################################################
### Configure which CPTs to retrieve ###
customPostTypes: [ "post", "page" ],
#########################################################
polylangLanguagesBy: { predefined: DEFAULT }
},
pagination: { limit: -1 },
sort: { by: DATE, order: DESC }
) @export(as: "ids") {
id
title
customPostType
}
compiledData: self {
ids: _arrayJoin( array: $ids, separator: " " )
}
}
query RetrieveIDsForCategories {
categories(
#########################################################
### Configure which taxonomy to retrieve ###
taxonomy: "category",
#########################################################
filter: { polylangLanguagesBy: { predefined: DEFAULT } },
pagination: { limit: -1 },
sort: { by: NAME, order: DESC }
) @export(as: "ids") {
id
name
taxonomy
}
compiledData: self {
ids: _arrayJoin( array: $ids, separator: " " )
}
}
query RetrieveIDsForTags {
tags(
#########################################################
### Configure which taxonomy to retrieve ###
taxonomy: "post_tag",
#########################################################
filter: { polylangLanguagesBy: { predefined: DEFAULT } },
pagination: { limit: -1 },
sort: { by: NAME, order: DESC }
) @export(as: "ids") {
id
name
taxonomy
}
compiledData: self {
ids: _arrayJoin( array: $ids, separator: " " )
}
}
query RetrieveIDsForMedia {
mediaItems(
filter: { polylangLanguagesBy: { predefined: DEFAULT } },
pagination: { limit: -1 },
sort: { by: DATE, order: DESC }
) @export(as: "ids") {
id
title
}
compiledData: self {
ids: _arrayJoin( array: $ids, separator: " " )
}
}
#################################################################################################
# Watch out: This will bring all menus, not just the ones in the origin language.
# Translated menus are those with a location containing the "___" string,
# e.g.: "header___es", "footer___fr", etc.
#################################################################################################
query RetrieveIDsForMenus {
menus(
pagination: { limit: -1 },
sort: { by: NAME, order: DESC }
) @export(as: "ids") {
id
name
locations
}
compiledData: self {
ids: _arrayJoin( array: $ids, separator: " " )
}
}
번역하려는 엔티티에 따라 쿼리의 해당 오퍼레이션을 설정하고 실행해야 합니다.
예를 들어, 게시물 카테고리의 ID를 가져오려면 택소노미 category를 인수로 전달하여 RetrieveIDsForCategories 오퍼레이션을 실행해야 합니다:
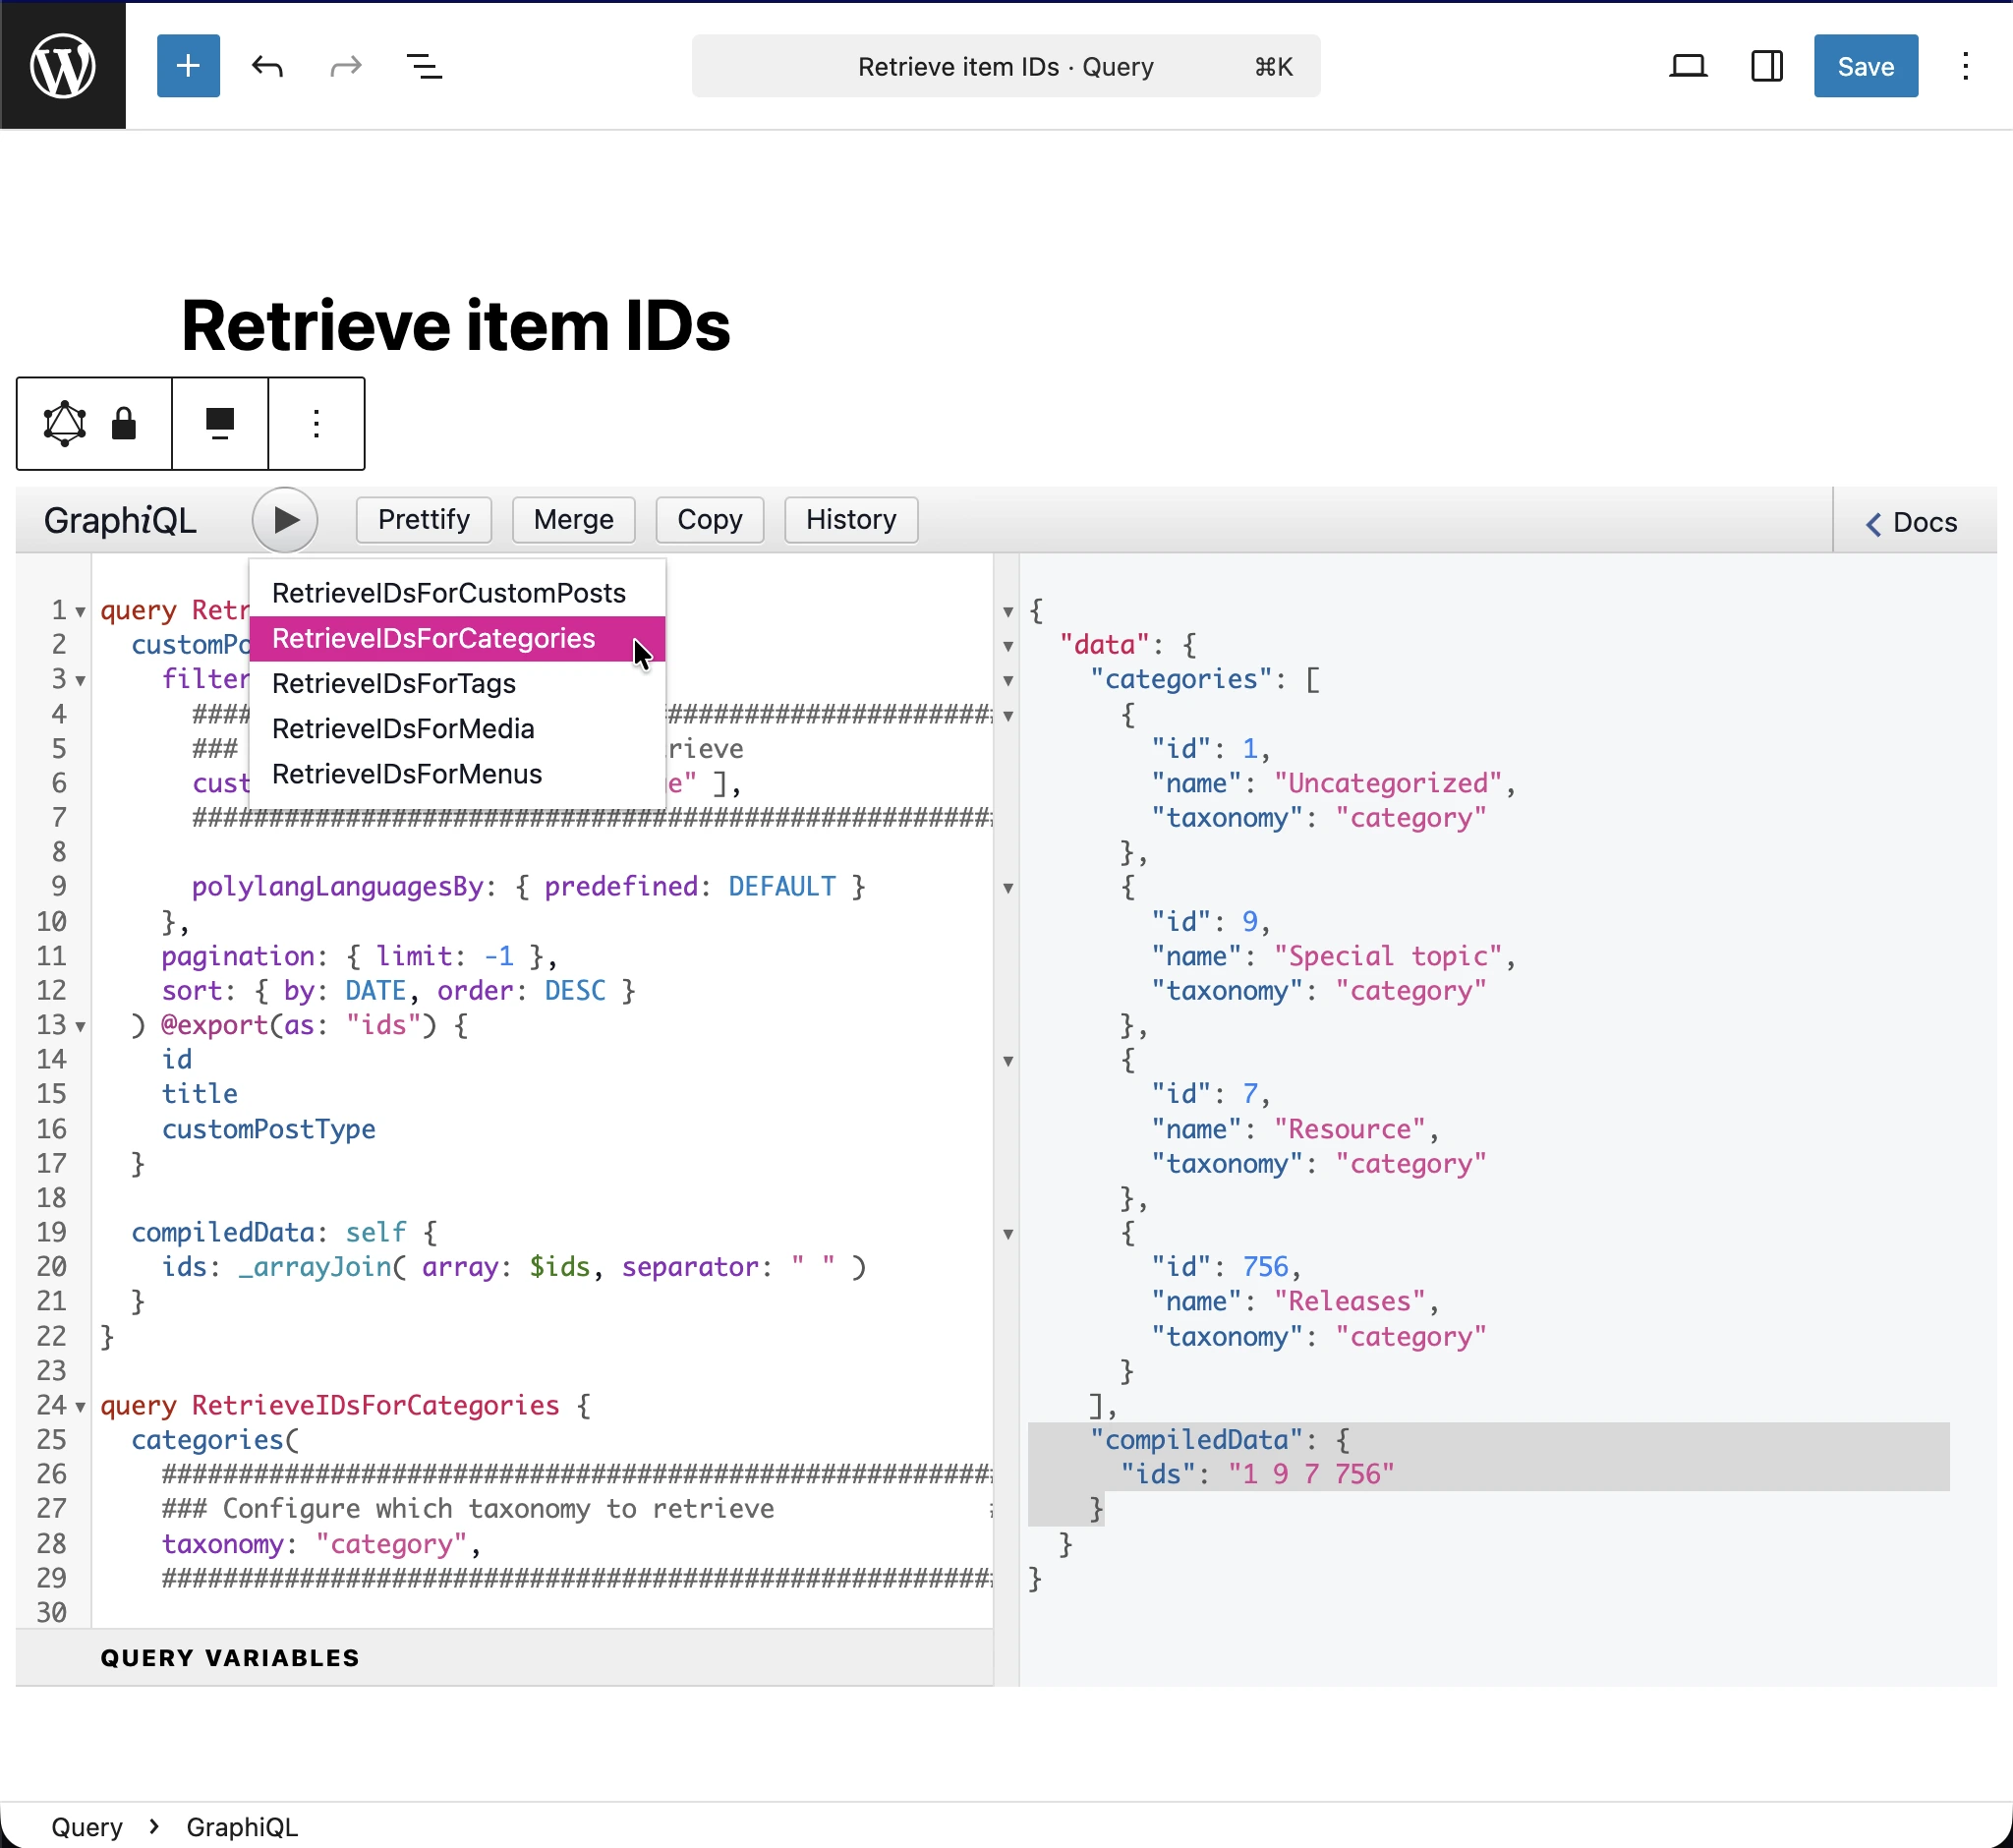
JSON 응답에서 번역할 항목의 ID는 data.compiledData.ids 항목(이미지에서 강조 표시)에 출력됩니다. 해당 문자열을 복사하여 설정 파일의 items 배열에 저장하세요.